Monday 30 December 2013

Polish Party: Black and White - Mix and Match Nail Art

Hello all,

The end of the month is here again and that means it's Polish Party time!  This month's theme is Black and White.  I knew that I was going to do a mix and match design for this, but it was just a case of deciding what patterns and designs.

Black-and-white-mix-and-match-nail-art.jpg

The black is Sally Hansen Midnight in New York, which has a really subtle shimmer, and the white is Models Own Snow White.  Here's a quick run through of what I went for when I took on the challenge this month.
  • Thumb - Checker board
  • Index Finger - Black with Barry M Confetti in Liquorice
  • Middle Finger - Double dot dotticure
  • Ring Finger - Half and half
  • Little Finger - Black with a white heart
None of these were difficult designs and I love all the patterns, unfortunately this was a disaster manicure though! My top coat was far too gloopy and did not dry.  I now have bubbles all over the white and hair imprinted into the polish.  You know when you go to bed and think it was dry enough... alas no... It just didn't dry :-( Sad times!  I had a feeling it was going to happen, so luckily I took my picture straight after finishing my design.  This means that my clean up was not quite as good as I would have liked, but still means I could share my design and join in with this month's Polish Party.

Lets hope the other girls didn't have a disaster like me... Take a look at their designs below 


Monday 23 December 2013

Christmas Tree Dotticure Nail Art

Hello all,

I have my last Christmas nail art of the season and more importantly it will be what I have on my nails on the big day!

Christmas-tree-dotticure-nail-art.jpg

This was a 'pinspired' design this week.  This year I have seen lots of Christmas trees done with striping tape, so I was looking for something different and came across this pin.  I loved it so much that I just had to have a go.  Clicking through and reading the blog post about this I found out that it was inspired by another blogger as well, so it's really going around now!

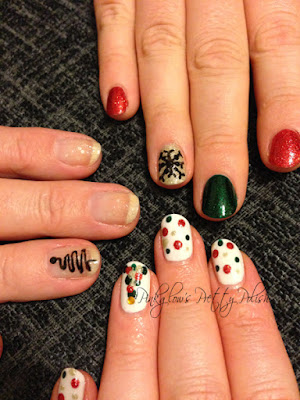
I started off with two coats of Snow White from Models Own.  This is a fab white polish.  A bit streaky of first coat, but perfect in two.  I then used Barry M Red Glitter, China Glaze Emerald Sparkle and Models Own Bora Bora to create my dots.  Using different the two different end of my dotting tool for the large and medium dots and then end of a cuticle stick for the tiny dots.  I repeated this pattern on all my nails, but left my ring finger free for my Christmas tree.  For the tree I started by dotting Emerald Sparkle in a single dot in the centre of my nail just below the cuticle.  Then two dots at the tip of my nail to create a triangle pattern.  I then filled in the rest of the tree with some extra green dots.  I then added three Red Glitter dots for baubles and three Bora Bora dots for tinsel.  The star had to be something a bit special so I added a yellow gem to sparkle away at the top of the tree.  Then came the tricky part... Top coating without causing drag on the dots over the white! And look... It worked!!!!!!! Yay!!

I love how festive this manicure is and what was even better was that it was so simple!  I also did some nail art for my mum and sister as well...

A fancy swirly tree for my mum and snowflake for my sister.

Christmas-nail-art.jpg

I hope you all like my Christmas tree dotticure and have a very Merry Christmas x


Monday 16 December 2013

Christmas Present Nail Art

Hello all,

Continuing the Christmas theme I have cute present nails this week.  And what could possibly make a present better? That's right, glitter!

Christmas-present-nail-art.jpg

I used Models Own Sardonyx from the Velvet Goth collection for my base colour.  You need two coats of this as it's a little streaky first of all.  It dries with a matte finish which means that it dries really quickly which worked out well for me as it meant that when I came to doing the bows my base was nice a dry.  I always make a mess when I used red polishes for some reason and this was no exception, clean up was a little tricky as it's glitter, but it worked out ok in the end.

To create the bows and ribbons for my presents I used the Models Own WAH Nail nail art pen in gold.  This was perfect for it as you have the striper brush when you twist the lid, but then you have the pen if you pull the lid off.  I started with two lines creating an offset cross on each finger and then used the pen end to draw two loops and tassels of the bow.

I topped this off with Sally Hansen Ista-Dri top coat to add a nice shine.  I really love how this turned out and it reminds me of Cartier in New York at Christmas...

Cartier New York 2006
Here's a picture I took whilst I was there in December 2006


Monday 9 December 2013

Snowflake Nail Art

Hello all,

I have done my first festive nails! Yay!  I love doing these snowflakes and this has become a sort of tradition now as I have done a variation of this design for the last few years.

Christmas-nail-art-snowflakes.jpg

I think these are the best ones I have done so far as I love the extra layer of sparkle I added.  I think this gives this design something a bit extra!  I started with two coats of Models Own Top Turquoise, then used a coat of NYC New York Colour in Lights-Camera-Glitter.  Then it was on to the snowflakes.  I used Models Own Snow White for these.  I used a striper brush from another polish for the star like bits of the snowflakes and then my dotting tool for the ends.

It's a really simple design which is why I like doing it.  The picture unfortunately does not do this glitter justice as you can't really see all the particles.  There are small bits of silver glitter and large glitter particles in blue and pink.  I think it really adds to the design making it look really frosty and wintry.  Hmmmm... now I've just got to decide what to do next!

Monday 2 December 2013

Blue and Purple Laser Nails

Hello all,

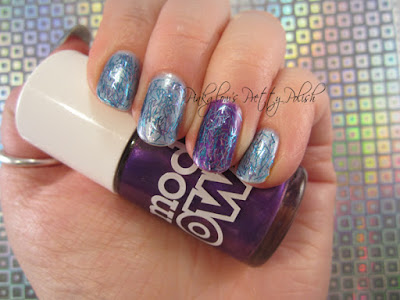
Just a really quick one today!  I have been having glitter withdrawals these past few weeks so I decided to try out Bourjois Laser in Blue Neon.

Blue-and-Purple-Laser-Glitter-Nails.jpg

I started with a base of Models Own Blue Med with an accent nail in Models Own Purple Imperial.  The Bourjois glitter is so pretty and the picture doesn't really do it justice!  I use two coats of everything here just to make everything bold and bright!

Doing this manicure I have rediscovered Purple Imperial... I have forgotten how pretty this colour was and I will have to use it again soon x

Monday 25 November 2013

Polish Party: Disney - Mickey and Minnie Nail Art

Hello all,

It's the end of the month, and you know what that means? Polish Party time.  Out theme this month is Disney.  I have loved Disney since forever and Mickey and Minnie have to be my favourite so when our theme was picked I knew they were going to feature.  I couldn't decide how to do them first of all, but then settled on hints of both characters.

Then all I had to do was decide how to include them both on one hand... Or did I?

Mickey-and-minnie-mouse-nail-art.jpg

I went for Mickey on my left hand and Minnie of my right hand.  Both have nails that are the same, because these features match on both Mickey and Minnie, so on both little fingers I chose to use yellow to represent their shoes.  Then on both index fingers I have a white base with three simple black lines to represent their gloves.  For Mickey I have on my ring finger and thumb, his iconic red shorts with yellow buttons, and for Minnie I have her red dress with white polka dots.  For my Mickey hand I used a little dotting tool to create mini Mickey's (hee hee!!) over a white base, and then for my Minnie hand how could I not include her bow?

I had so much fun doing these and I love that I have a different character on each.  As I type it looks like Mickey and Minnie dancing across my key board.  They certainly brighten up my day when I look at them.

Don't forget to keep up with what of the rest of the Polish Party girls have done for their Disney themed nails.  Follow the links below to take a look


Monday 18 November 2013

Gone Wild - Animal Print Nail Art

Hello all,

Well, it seems it's only too easy to change my mind.  Having done a first last week, leaving a manicure matte, there is no stopping me now.  I have only gone and done it again!  After a comment on Twitter on my nails last week I was inspired to create my design this week and I am so so SO pleased with how they turned out.

Barry-m-animal-print-nail-art.jpg

These are my gone wild animal print nails.  Aren't they fun?  These took me quite a long time to do, but only because I wanted them to be just right so I took plenty of time.

From my thumb round to my little finger I have done, zebra, leopard, tiger, giraffe and cheetah prints.  I had the first four in mind all week long before doing these but had to think a bit more to come up with cheetah.  Want to know how I did these?  Well here goes.

Zebra - I started off with two coats of Snow White from Models Own.  After this had dried I used my Barry M nail art pen in black to freehand the stripes.  I bought the nail art pen especially for this as I was quite worried about this print and trying to do it with a striper or brush.  I can tell you now that I am most definitely not a fan of zebra print.  On my other hand I ended up removing it three times before it was only ok.  I do not think I will be doing this print again.  Well not freehand anyway!

Saturday 16 November 2013

Sunshine Award

Hello all,

I was nominated for a Sunshine Award by The Imprefect 10.  I hadn't heard about it before, but here it is...


It works like this

Post the Sushine Award picture in the blog post
Post 11 random facts about yourself
Answer the 11 questions from the blogger who nominated you
Nominate 11 other bloggers for the award
Write 11 questions for them to answer

I can tell you now, I am going to cheat a little bit as I am not going to nominate 11 people as I know there are some bloggers who prefer to keep things a bit more private... but I invite anyone who would like to take part to go ahead and answer my questions if you'd like to... even if you just want to do it in the comments section perhaps, rather than write a whole post.

Monday 11 November 2013

Barry M: Matte Dots

Hi all,

I have a first on my blog today... matte nails.  I haven't ever left any nails with a matte effect before, but since I won the whole of the autumn/winter collection from Barry M which included their matte collection in coffee shop colours.

Barry-m-matte-dots.jpg


I decided to use Caramel and Brown Mocha first.  On my thumb, index and middle finger I have Brown Mocha as a base and then Carmel on my ring finger and little finger.  I have then added some simple dots in various sizes along the sides of my nails in the opposite colours.  I found that the colours were a little patchy on the first coat, but on adding a second coat it's perfect.  To keep the matte look I went out on a search for a matte top coat and decided on Bourjois So Matt which did just the trick.

As this is the first time I have had matte nails they have taken a bit of getting use to.  When I finished them they almost didn't looked finished!  I do like the effect though and it's growing on me.  I think what has helped that these are the first truly matte effect finished polishes that I have tried, despite others claiming to be matte.

I'd love to see what other looks people have come up with with the Barry M matte polishes - leave me a link so I can take a look x


Monday 4 November 2013

Rimmel Space Dust: Moon Walking

Hello all,

I have another Space Dust polish from Rimmel to show you today - my mum got me another one! Eeeek! Best mum EVER!!  Space Dust are gorgeous textured glitters, packed with sparkle and shine.  I have already tried Total Eclipse and loved it, and for a textured polish it was really easy to take off which I was pleasantly surprised about.

Rimmel-Space-dust-Moon-walking.jpg

This is Moon Walking, which as you can see is such a pretty purple.  It's a sort of lilac base packed with glitter.  There are larger silver circles of glitter and slightly smaller dark purple bits of glitter.  Moon Walking is even more sparkly than Total Eclipse, I can't stop looking at it when it catches the light.  As I said before these Space Dust textures are my favourite textures... Only question now is which one next!!

I'd love to see any of the other colours if anyone has tried them.  Leave me a link so I can have a good old nosey x 

Monday 28 October 2013

Polish Party: Halloween - Frankenstein Nails

Hi all,

It's Polish Party time again - Yay!  This month's theme is Halloween... Well how could it not be?

I was a bit stuck for what to do, because you can often see a lot of the same things when looking at Halloween nail art, and whilst I haven't steered too far away from 'the norm', I hope I have come up with something a bit different.

I wanted to keep to the same colour pallet on all my nails as I didn't want too many colours all trying to compete with the others, so once I had decided on Frankenstein nails I chose the others based around that.  So obviously I had green and black.  I then paired those with silver and a bit of glitter.

Frankenstein-halloween-nail-art.jpg

I painted my thumb and ring finger in the limited edition green from Barry M that was out in the summer from Superdrug.  Then my middle finger and little finger are painted in Sterling Silver from Models Own. To finish off my base colours I used Knockout from Revlon on my index finger.

For the details on my silver nails I have done some simple stripes and dots.  I used the Models Own nail art pen for the stripes and a dotting tool dipped in my Revlon black polish.  On my index finger I kept it simple with a coat of Startlet by Jessica.  It's such a pretty multi toned glitter that would go with anything.

My thumb nail is a little bit more fancy.  I have done the ends of a plaited nail just on the tip.  I added a diagonal stripe in silver first and then another in the opposite direction in black.  As you can see from the photograph the silver over the green has actually gone a greenish gold colour.  It's a happy accident as I really like it, but obviously wasn't meant to be like that.

On my ring finger we have a not so scary, but rather cute Frankenstein.  I simply added some dots of black for his hair near my cuticle and then wiggled the polish around to create the cover required.  I then added two white dots for his eyes with a smaller black dot in the middle.  Using my nail art pen with striper I added his little stitched up mouth.

I really enjoyed doing this design even though it wasn't what I had originally planned.  Don't for get to check out the other girls taking part in Polish Party this month x

Monday 21 October 2013

Rimmel Space Dust: Total Eclipse

Hello all,

I had to do a mid week nail paint last week, which I don't normally do, but I had used nail foil and unfortunately even with a top coat on it doesn't last long.

I has spotted Rimmel Space Dust polishes in Boots when I was in there looking for some other bits and had already mentally made a note to put them on my Christmas list because I love anything glittery!  Anyway, I need one less now as my mum happened to buy me one - Aren't mums the best!

Rimmel-Space-dust-Total-eclipse.jpg

This is Space Dust in Total Eclipse.  Its a pretty green textured polish with different sized and shaped glitter particles.  It has a duochrome effect, because in some lights it's really green and then in other lights you can see purple flecks.  When textured polished first started coming out I wasn't sure about them to be honest as I love to go for a smooth shiny finish, but they have really grown on me with the ones that I've tried now.  I really like the texture of the Space Dust as it's not too bitty, but still has the same effect.  I have added a top coat over the colour as I like a nice shine, but it didn't take away from the texture at all.  Now you're probably thinking that it's all very well that it's a pretty colour and a nice texture, but that it will be a pain to take off... well it's not! Woo!! I thought I was going to be scrubbing away for ages with cotton wool (I have run out of foil to use that method!), but I was pleasantly surprised and it was off in a flash.

Overall I would say that so far that this is my favourite textured polish and I look forward to trying the other colours in the collection.  Have you tried any? I'd love to see them if you have, leave me a link so I can take a sneaky look x

Monday 14 October 2013

Barry M: Chameleon Pink with Nail Foil

Hello all,

So... I had a bit of a disaster with my nails this week.  I got Chameleon Pink from Barry M and completely misunderstood the effect.  I painted this lovely pink on and left it to dry.  Then I painted on my normal top coat admiring how, when it was cold with the top coat it changed to a pretty purple.  As my top coat was drying, I spent ages watching my nails as they warmed up to see the two tone colour.  Only after a while with no changes did I look properly at the bottle and realise that it changed colour with the top coat and not with heat! So there went my idea of two tone nails changing from hot to cold! Silly me! What you're actually meant to do is paint on a design with your top coat and those are the bits that change.  So having full purple nails now I had a think about what to do and decided to use some nail foil.

Barry-m-chameleon-pink-with-nail-foil.jpg

I chose this pretty lacy design which I think worked really well over the purple.  I have had my nail foils for about a decade so I was very impressed to find that my foil adhesive hadn't dried up.  I have found the same pattern in this foil in a different colour here.  I really like this effect so I think I'll have to do some more foil nails soon with my other designs.

Who else has tried nail foils? Leave me a link so I can take a look x   

Monday 7 October 2013

China Glaze Purple Panic and Maybelline Pretty in Polka

Hello all,

I've got a really quick post this week to show off my new goodies that I was bought from America.  China Glaze Purple Panic and Maybelline Colour Show Polka Dots, Pretty in Polka.

China-glaze-purple-panic-and-Maybelline-pretty-in-polka.jpg

As you can see Purple Panic isn't really purple at all, but more of a fuchsia pink.  It's such a pretty colour.  I first saw this on another blog and had it on my wish list from that point onwards (along with another China Glaze which has been discontinued - boooo!!)  I was surprised to find out that it was a matte finish though.  I had only seen it glossy!

The Maybelline Colour Show Polka Dot colours are such a pretty collection.  Pretty in Polka has black and white polka dot shapes in various different sizes in a light pink base.  As I chose to layer this over my China Glaze I don't actually know what it looks like on it's own, but I would imagine you'd need quite a few coats for it to be an opaque colour without a base.  I love the dots, in this polish, it's a fun textured look without having glitter.

I am loving the fact that this manicure still fits with Breast Cancer Awareness Month - I can still show my support in pink!  I'd love to see other people's swatches of Polka Dots - leave me a link in the comments x

Monday 30 September 2013

Breast Cancer Awareness Month Nail Art

Hello all,

Did you know, October is Breast Cancer Awareness Month?  Breast Cancer is the most common cancer in the UK and Breast Cancer Care would like to raise as much awareness, help and support for those affected by it.

Over on Twitter @JosephineJakobs asked if anyone would like to get involved to help spread awareness by creating fabulous pink manicures to show our support and share them all to help promote the cause.

So here are my pink nails.  As you can see I have gone all out pink on pink to show my support.


Breast-cancer-awareness-month-nail-art.jpg


I used Models Own polishes to create my nails, using Pink Fever as a base for all my nails other than my ring finger where I have used Pastel Pink. 

On my thumb I used a fan brush dipped into Patel Pink and gently brushed it over the nail to create stripes.  I then did the same again, but using Pink Fever to create the marbled stripe effect. 

Moving on to my index finger I have done a reverse glitter gradient using Magenta Devine and Hot Stuff.  I have done this look before and really loved it, although here I let Hot Stuff take over a bit more in comparison to my previous manicure as it's such a sparkly glitter and I really wanted to make an impact with the pink. 

On my middle finger I have again recreated a dotty design that I've done before in monochrome colours, this in fact remains my most popular post.  Here I have used Pastel Pink and Strawberry Tart. 

On my ringer finger I used Pastel Pink for my base, as I said above.  I then hand painted a Breast Cancer Ribbon on using Pink Fever.  These were a bit tricky to paint, especially on my right hand (or Cinderella hand - have other people seen this used before, as in, the one that does all the work, but never really gets noticed?), but I got them to look ok in the end.  I added a little pink gem in the middle of the ribbon.

Then on my little finger I have just painted a block coat of Magenta Devine.

I really hope my nails get spotted by people and that they make people think about Breast Cancer and perhaps even donate to such a fabulous cause.  I found something perfect for you nail junkies out there to get if you wanted to make a donation.  How about these cute mini nail files for just £2? I hope you like my awareness design and I look forward to seeing what everyone else comes up with x

Monday 23 September 2013

Polish Party: Autumn - Hedgehog Nails

Hi all,

Today I have my first post for the Polish Party group challenge.  I am so excited to be taking part in this monthly challenge along with some other girls from Twitter.  To find out more about who's taking part click here.

We decided that our first month's theme was going to be Autumn, so I started to think about different ideas.  I had a quick search to see what other autumn nails were out there, and I really could find that many different ones.  Most seemed to come grouped together with Halloween.  There were lots of browns, yellows and golds in the ones that I saw.  Still not really having a plan I typed into Google, autumn animals for some inspiration.  In amongst the foxes and owls there was a cute little hedgehog nestled in some autumn leaves; I had my idea... hedgehog nails.

Hedgehog-nail-art.jpg

I used Barry M nail paints to create my loved up hedgehogs.  For their spikes I used a small nail art brush dipped into Mushroom.  Staring in the middle of my nail I painted stripes towards the tip of my nail.  To make their faces I simply mixed together a few drops of Mushroom with some white polish.  Using a dotting tool I created a small semi circle for the face and two little dots for ears.  In the middle of the ears I used the smaller end of my dotting tool and Strawberry Ice Cream to make them pink inside.  Then adding the nose and eyes I used a nail art pen in black.  Tah dah, autumn hedgehogs! I decided that I didn't want to do hedgehogs on every nail so I used Dolly Mixture Confetti as I thought this looked a bit like falling autumn leaves.  I then used a pink nail art pen to draw on a little love heart in the middle of my two hedgehogs.  I am a little disappointed that the heart doesn't photograph very well; it doesn't look that bad in person, but I love how my hedgehogs turned out.

Make sure you check out the other Polish Party girls taking part using their links below.  Leave me a comment to let me know what you think of my design.  What should the next Polish Party theme be?

Tuesday 17 September 2013

Models Own: Fiesta Collection Round Up*

Hello all,

I just wanted to do a quick post to sum up all of the Fiesta collection from Models Own.

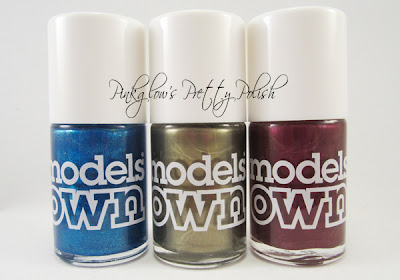
The collection includes three limited edition colours in Candy Blue, Fashionista  and Hot Magenta and are initially available to people testing the new Ford Fiesta. To register your interest you need to visit the Ford Retail site www.glamitupagear.com and register your details, and then visit one of the show rooms and take one of the new cars for a spin.


* Press sample - sent to me for review


My favourites out of the collection have to be Candy Blue and Hot Magenta.  Fashionista is lovely, but just not a very me colour.  A word of warning with Candy Blue though, it caused a bit of staining on my fingers, not so much the nails, but my skin, it came off fine with a little bit of a scrub, but could have been an interesting look!
 
Kayleigh Holder, Head Manicurist of Models Own said 'The bold colours we've included in the Ford Retail 'Glam It Up' nail polish set, are in an easy way to add a touch of glamour to your look. The on-trend Magenta helps keep your nails classic, whereas the Candy Blue and Fashionista colours can help make a bolder statement, especially for the upcoming party season.'
 
I couldn't agree more.  So to sum up -
 
Candy Blue - a gorgeous dazzling blue, perfect if you want to make a bold statement.

Fashionista - a greeny gold for an elegant touch to a party outfit this Autumn/Winter season.

Hot Magenta - a very wearable classic pink that will take you from office to evening perfectly.
 
 
Will you be registering for a test drive to 'Glam it up a Gear'? Leave a comment and let me know.


Monday 16 September 2013

Models Own: Fiesta Collection - Hot Magenta*

Hello all,

Today I've got the last polish from the Models Own Fiesta Collection - Hot Magenta.

Models-own-fiesta-collection-4.jpg

The collection is initially available to people testing the new Ford Fiesta.  To register your interest you need to visit the Ford Retail site www.glamitupagear.com, visit one of the show rooms and take one of the new cars for a spin.

* Press sample - sent to me for review

Models-own-fiesta-collection-2.jpg

Tuesday 10 September 2013

Black and Gold Glitter Nail Art

Hello all,

As you may have seen yesterday I posted swatches of Models Own Fiesta Collection in Fashionista.  Even though it's a nice colour, it's not a very me colour so I decided to top it off with some nail art.

Black-and-gold-glitter-nail-art.jpg

I started by using Revlon Knockout to create my diagonal black nail tips.  These diagonal lines tilt the opposite way on both hands, so when you look at my nails they all match up nicely.  Once this was dry I topped off my nails with Wet n' Wild Tonight's Going To Be A Good Night.  This is a gorgeous multi glitter with both black and gold glitter particles in it.  The black glitter is slightly smaller and gives quite good coverage.  The gold glitter is a bit trickier to place on the nail, but it's worth moving it around with the bush to get it in the right place.  I love how the opposite glitters contrast against the polishes I've used.

This would be a great manicure for a party or an occasion.  I like doing nail tips like this for a quick touch of nail art.  Have you done any nails like this?  I'd love to see... leave me a comment below x

Monday 9 September 2013

Models Own: Fiesta Collection - Fashionista*

Hello all,

Today I have a review of the second polish in the Fiesta Collection, Fashionista.

Models-own-fiesta-collection-4.jpg

The collection is initially available to people testing the new Ford Fiesta.  To register your interest you need to visit the Ford Retail site www.glamitupagear.com and register your details, and then visit one of the show rooms and take one of the new cars for a spin.

* Press sample - sent to me for review

Models-own-fiesta-collection-3.jpg


Monday 2 September 2013

Models Own: Fiesta Collection - Candy Blue*

Hello all,

I have a very exciting review to share with you.  I was sent a brand new collection from Models Own who have collaborated with Ford Retail to develop a bespoke collection of nail polishes for the Autumn/Winter.

The Fiesta Collection includes three limited edition nail polishes in Candy Blue, Fashionista and Hot Magenta.

Models-own-fiesta-collection-5.jpg


Models-own-fiesta-collection-4.jpg

The collection is initially available to people testing the new Ford Fiesta.  To register your interest you need to visit the Ford Retail site www.glamitupagear.com and register your details, and then visit one of the show rooms and take one of the new cars for a spin.

I decided to try out Candy Blue first... so lets take a look.

* Press sample - sent to me for review

Models-own-fiesta-collection-1.jpg


Wednesday 28 August 2013

Guest Post: The Naily Mail - Pastel Mosaic Nail Art

Hello all,

Today I have something exciting - it's a guest post from Lauren at The Naily Mail.  Since joining Twitter I have come across lots of lovely nail blogging ladies and Lauren's designs caught my eye right from the beginning.  We've chatted over Twitter and decided that we would do a guest post on each other's blogs.  So here you go, let me pass you over... 


Hello everyone! I'm Lauren, a nail art blogger from Lancashire. I started my blog, The Naily Mail, in February and since then I have met so many lovely bloggers and think I have made a huge improvement in my nail art, so I'm very excited to now be doing my first ever guest post! I’m glad it is on Pinkglow's Pretty Polish, Aimée was one of the first bloggers I got to know and I love her nail art and reading her blog, so I feel very privileged to be on here!

For our first guest posts we decided on a pastel theme and to see what we both came up with using these colours. So here's what I did:


I've been into half & half manicures lately so thought, why not do another?! I'm also a lover of mosaic designs so I wanted to include that too.

Monday 26 August 2013

Character Designs

Hello all,

I am doing a guest post later on this week over on The Naily Mail and I will have a post from The Naily Mail here for you later on this week, so keep an eye out for those.

Today I thought I would share some older designs that I had done before I had my blog.  I have to apologise for the quality of the photographs as I took them on my phone.

Character-designs.jpg

First I have a cute little monkey that I saw over on I Have A Cupcake.  Her designs are so cute and I had to give this a go.  Hope on over and take a look at her videos.

Second I have Captain America and Iron Man.  I did these based on Google searches for Avengers nail art and painted them especially to go and see the film!

Third I have some cute piggy nails.  I saw these on Real Asian Beauty and seeing as pigs are my favourite animals I just had to do these!

Lastly I have Rudolph nails.  These were inspired by Cutepolish.  I'm sure most of you will have come across Cutepolish at some point.

What do you think of some of my earlier attempts and recreations of other's designs? I'd love to see some of your first attempts - why not leave me a link in the comments below?

See you again later on in the week for the post from my guest blogger x

Monday 19 August 2013

Miss Sporty: Metal Flip - Aurora Borealis

Hello all,

I had a busy weekend this weekend, but it was busy in a good way!  I reached 200 followers over on Twitter so I had a bit of a mini giveaway to celebrate! The lovely Samantha from @Smugginsx was the winner and I have posted off her prize today, so hopefully she will get it in the next day or two.  And on the same day I won a giveaway from Barry M!!! Eeeek!! So exciting! I won their whole confetti collection and it should be with me soon!! Yay!!  I will post about them when they arrive!

Anyway, onto the main point of my post... This week I went for something simple.  As I mentioned last week I was bought Miss Sporty Metal Flip in Aurora Borealis, and although I used it in my ombré last week it got a little lost, so I said I would do a swatch of it and talk about it in more detail.


Miss-Sporty-Metal-Flip-Aurora-Borealis-3.jpg

The Metal Flip polishes from Miss Sporty are duochrome effect polishes that shift, or flip, between colours depending on the light.  Aurora Borealis is bluey silver polish with hints of purple and gold.  I have taken some other pictures in different lights to give you an idea of how it changes.  Above you can see my normal blog type picture taken in a light cube.  Here you can see that it's more blue showing some hints of purple.


Monday 12 August 2013

Blue Ombré featuring Miss Sporty Metal Flip - Aurora Borealis

Hello all,

Just a very quick ombré design this week using a pearl and blues.  I was bought Miss Sporty Metal Flip in Aurora Borealis and wanted to use it, but I had already decided on an ombré design, so I didn't just want to do a swatch, so I decided to use it in my design.

As the polish has a metallic finish I picked others that were similar and went for a pearl base and True Blue from Models Own as my darked shade.  I created my ombré by painting the three colours in stripes on a make up sponge and then applying it to my nail, which I had already painted with one coat of the pearl polish.

Here is my finished result -

Miss-sporty-metal-flip-Aurora-Borealis.jpg


 I love the blend of the colours, although I think True Blue may have overpowered here a little bit, but the overall metallic finish is lovely.  I added a top coat to blend the three shades together and then topped my ring finger with thee nail gems, in a reverse ombré order to my polish with dark blue on the pearl section and clear on the dark blue.

I will do a proper swatch and review of Miss Sporty Metal Flip in Aurora Borealis soon, as it is so pretty with it's multi faceted shine and different colour oil spill effect.  Look out for it here soon x

Tuesday 6 August 2013

Jacava: Raspberry Bavarois with Glitter

Hello all,

Hopefully yesterday you saw my review of Jacava Raspberry Bavarois.  I wanted to present it as just a plain colour for the review and I wanted to leave it on it's own to see how it well it lasted over a normal day (No chipping so hooray!).  But today I felt the need to add some nail art to it.  I haven't gone mad, but since I started doing nail art more and more, it seems very odd when I then don't have any!

I decided to try out a reverse glitter gradient with two Models Own colours, Magenta Divine and Hot Stuff.  I chose these two colours for my glitter gradient as they are the perfect match for Raspberry Bavarois.

Jacava-raspberry-bavarois-with-nail-art.jpg

I also chose these two colours as I hadn't tried a gradient like this before, so I didn't want it to be too obvious if it went a big wrong.  I started off with Magenta Divine for the base of the gradient, brushing most of the polish off the brush.  I then dabbed the polish that was left on the brush at the base of the nail by the cuticle.  Once all of the polish was on my nail I then dragged the brush from my cuticle down the nail, this spread a little bit of the glitter down the length of my nail.  I repeated this step again until I was happy with the look and then left this to dry.  To add an extra bit of sparkle I then dabbed some larger glitter pieces just by my cuticles using Hot Stuff.

I really love the effect, it almost looks like a waterfall of glitter down my nails! What do you think? Have you ever tried this before - leave a link in the comments to show me your version x 

Monday 5 August 2013

Jacava: Raspberry Bavarois*

Hello all

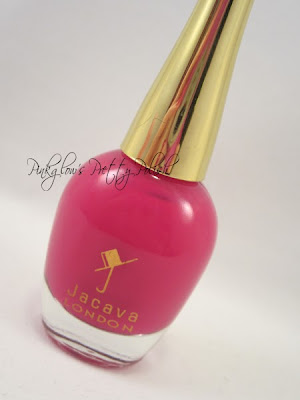
Today I have a brand new polish that was sent to me for review by Jacava.  I was very excited to see their email pop up in my inbox asking me if I would like to review one of their colours.  I was able to pick from their range, there are 18 at the moment ranging from pinks, reds, purple, blue and green and there is also a selection of more neutral shades and a clear base coat / top coat.

I chose Raspberry Bavarois


Jacava-raspberry-bavarois-7.jpg


Jacava polishes are '8 free', they say on their website -

'Opulent nail polish, by JACAVA London, is the world's first '8-free' nail varnish. That's free from DBP, Camphor, Formaldehyde, Toluene, Collophane, Parabens, Phthalates and Animal Ingredients. We never test on Animals and our nail polish is Vegan friendly.

All JACAVA nail polish uses premium, high gloss, long-lasting and nourishing formulation helps your nails stay stronger and grow longer. Designed in London and made in the UK, JACAVA is a quintessentially British nail polish brand.'

Monday 29 July 2013

O.P.I Liquid Sand: Can't Let Go

Hello all,

I have a swatch this week of O.P.I Liquid Sand in 'Can't Let Go'.  I had a voucher for John Lewis for ages and found myself there at the weekend, so I decided to spend it on this gorgeous nail polish, making it only £1.50! Woo!

Anyway,  I was spoiled for choice at the O.P.I stand and did have to chuckle at the conversation between a flustered looking man and the sales woman whilst I was there -
Man - 'I have been looking for this for ages'
Sales woman - 'How can I help you'
Man - 'I've been told to get Liquid Sand in red'
Sales woman - 'Is this for someone else'
Man - 'Yes'
Sales woman - 'Well, it's just that none of the colours are called red'
Man - 'She just told me red'
Sales woman - 'This one is called Magazine Cover Mouse'
Man - 'Who names these things?? She just said red'
Sales woman - 'Did she want glitter, or just a colour'
Man - 'Red, that's all she said to me, Liquid Sand red... I'm going to call her'

I thought it was quite funny myself! Girls, if you send a boy out for polish, be warned, give more instructions that just 'red'!!

Anyway, here is Liquid Sand 'Can't Let Go'

OPI-liquid-sand-cant-let-go-matte.jpg

Pretty Please

Hello all,

Could you do me the biggest favour and hop on over to the Grazia magazine website and vote for my Pastel Rainbow Ombré nails in the Grazia magazine and Nails Inc competition here : http://ow.ly/nqcbt - look for @pinkglowspolish to vote!!!

Please please please! Thank you x x x

Pastel-rainbow-ombre-nail-art.jpg

Sunday 21 July 2013

Pastel Rainbow Ombré

Hi everyone,

I keep seeing lots of different ombré nail designs around and they are just so pretty for summer.  Normally when I do ombré nails I tend to use variations of the same colour and sponge each one on individually as you can see here, but most people seem to paint their colours on the sponge directly in stripes and then dab on the nails.  I had previously tried this design using my normal technique and failed miserably! They just looked a complete and utter mess.  So I ended up taking it off and doing something different that week.

I still wanted to try this design because I have seen a few different variations of it such as here on Pinterest and here on YouTube.  So here it is...

Pastel-rainbow-ombre-nail-art.jpg
 
 
I started off my pastel rainbow ombré, by painting all of my nails with a pearly white base.  I chose a pearly one because for some reason whenever I paint an entirely white base, I make such a mess and this time round I really didn't want anything to go wrong before I had even really started.
 
 
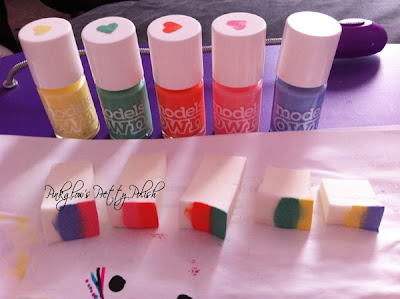
After my pearl base had dried I then got my Models Own Ice Cream Sundae collection and make up sponges ready.  I lined all my colours up with the tops already unscrewed so that I was realy to paint the stripes of colour directly on to my make up sponges.  I chose to use five sponges, one for each of the different ombré combinations on each of my nails.  I don't waste the sponges though as I cut off the end when I've finished and the polish is dry.  Then I can use it again afterwards.  I made sure the sponge was slightly wet before I painted on the polish so it didn't soak in too much before I had chance to dab it on to my nails.  This is what my work station looked like when I had finished all my nails.
 
Ombré-nail-art-prep.jpg
 
 
I started with my thumbs and chose yellow and green.  Yellow at the base of my thumb and green at the tip of my nail.  I then moved to my index finger and chose to continue with the green, this time at the base of the nail and I combined that with orange.  I continued using the previous nail tip colour on the base of the next nail, orange into pink, pink into blue and blue into yellow.
 
If you read my blog a lot you will know that I like glitter.  So to blend my colours and add that extra sparkle I used a coat of Rimmel Disco Ball.
 
I am really pleased with this design and it just goes to show if at first you don't succeed, try try again x


Monday 15 July 2013

Essie: The Girls Are Out

Hello all,

I had a very busy and hot weekend clearing out the loft and it was not a friend to my nails at all! I was going to take a picture of the damage, but it was just too sad!  But as a treat after working so hard I happened to stop by the Essie display at Boots and find my nails a lovely treat!


Essie-The-Girls-Are-Out.jpg
 
 
The Girls Are Out is such a pretty pink with the tiniest fleck of silver glitter in (hence my silver accent nail just to jazz things up a little bit!).  The colour is so rich, and the formula is great.  If you were careful you could get away with one coat, but I chose to do two.  This made the colour even more intense and bright.  My accent nail is Models Own Sterling Silver.
 
 
Nothing much else to add other than... look how pretty!! x

Tuesday 9 July 2013

E.L.F: Sunset Double Dot Dotticure

Hello all,

I have been pretty busy recently so there hasn't been too much time for blogging :-( Sad times.  I will have to dedicate some time to catch up properly with all my blog reading as I'm sure I'll have missed a load of great stuff.

Anyway, I have something very simple this week.  I started off with just a solid colour this week as I didn't really have time for anything else.  I chose E.L.F Sunset which is a really pretty pink.  This week however, I am painting nails at the charity fair for the students of the school that I work at, so I didn't think it would be right not to have any nail art.

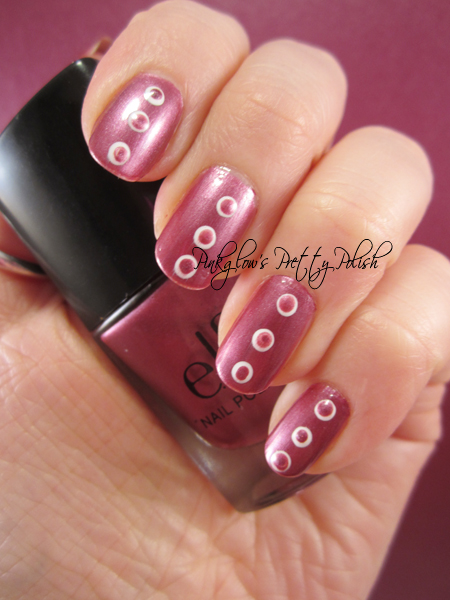
Tonight I have livened up my mani with my double dots.  Just three down the middle of each nail.  I think I am all set to go for the fair tomorrow without having to start my nails all over again!  I hope that my nail painting will be popular to help the student raise money for their charities.

Sunset-ELF-double-dot-dotticure.jpg

Tuesday 2 July 2013

Fancy French Manicure

Hello all,

I just wanted to share with you a really simple way to make a French manicure more fancy.

Fancy-French-manicure.jpg

I had a bit of bother with my nails on Sunday night/Monday morning.  I painted them a really pretty lemon yellow and added some nail decal stickers on /Sunday night, then when I woke up in the morning they were covered in imprints from my hair! The nail polish hadn't set properly in the hot weather so off it all came.  I had to go to work with naked nails!!!  Anyway, yesterday evening I redid my nails in a simple French manicure but I wanted to add something a bit different.  I used pink, turquoise and black stripers to add three small lines on my ring finger.  I then used a small dotting tool to add a row of dots in the same colours next to the stripes.  I then added a single dot on the rest of my nails, other than my thumb where I have a row of dots of the three colours again.

I hope this gives you an idea on how to tart up an ordinary manicure in a really simple way x

Monday 24 June 2013

Pink Punch with Black and White Dots

Hello all,

So, last week I had a nail disaster... I attempted painting my nails twice before settling for something simple and hassle free.  I was trying out a new design and it wasn't going right, not even a little bit... To put it simply it was a mess! So off that came!! So then I went for a glitter gradient with Models Own Jack Frost as one of the glitters, but that was also a disaster - sad times! Jack Frost is really thick and just didn't dry along with the other glitters so that just simply slid off my nails, so back to square one I went.  At this stage it was getting late, but I didn't want nudey nails as I was off to a BBQ the next day, so went for Models Own Grape Juice and Rimmel Disco Ball Glitter.  You can't go wrong with yummy smelling nails and a go to glitter.  I will attempt both failed designs again, but with more time and more practise first!

This week I am back with something a little more arty.  Seeing as the sun seems to have disappeared again I thought what better than something from the Ice Neon collection from Models Own to jazz things up?

Models-own-ice-neon-pink-punch-with-dots.jpg

Pink Punch is such a lovely colour and it really is neon bright, I have always had so many compliments when wearing it, I think because it's so hard to miss :-)  I don't really ever know how to describe Pink Punch when talking about the colour because it changes depending on the light you're under at the time.  Here you can see my first post about it.  It's named pink, but I think it's more of a coral orangy pink.  In this picture, compared to the last picture I posted of it I think it looks more orangy red.  Right now whilst typing because it's different light again it looks more pink.  This is one of the reasons I love this colour it can look different depending on where you are or what you're wearing really.  I decided to go a bit dotty this week using black and white alternately on my nails adding a mixture of larger and smaller dots.  It reminds me of Minnie Mouse!

I hope you are loving this one as much as I am?  Have you got any of the Ice Neon's? I'd be interested to know if anyone does keep theirs in the fridge and if it has made a difference in your opinion.  Leave a comment below and let me know x

Monday 10 June 2013

Barry M: Blue Grape and Bubblegum Confetti

Hi all,

It's just a quick post this week to show off the gorgeous Barry M Blue Grape Gelly and Bubblegum Confetti.

Barry-m-blue-grape-and-bubblegum.jpg

 
Blue Grape is my first Gelly and I love, love, love it!!!!! It's such a rich blue and when they hi-shine, they mean it! I haven't been able to stop looking at my nails since I put it on.  As it's a gelly it's quite a thick formula.  If done carefully you could get away with one coat, but I would recommend two.  It takes a little longer to dry than other polishes, but it's worth it for the hi-shine afterwards.  You could get away without a topcoat if you wanted but I always like to use one to prolong my manicure.
 
As you can see I topped this with Bubblegum Confetti.  This too is gorgeous.  It is jam packed with tiny flecks of light blue and white.  I have only used one coat, but got plenty of coverage, I didn't want to over do it otherwise you wouldn't see my Blue Grape underneath.  It would work well building it up in layers as well if you wanted to go with that look though.  The finish isn't grainy after one topcoat either which is a great bonus!
 
I can see myself going for some more Barry M gellies and confettis! Have you got any? What are your favorites? x

Monday 3 June 2013

Camouflage Nail Art with Tutorial

Hello all,

I was bought camouflage colours ages ago but haven't ever got round to using them so I thought it was about time.  I also haven't done a step by step for ages, so I have done one for these nails.

Camouflage-nail-art.jpg


The colours that I have used are Mushroom by Barry M, and Becca's Brown, Grace Green and Mushroom (I will now add MO after this when referring it to it in the rest of this post) all by Models Own.

I decided that I wanted to do the camo print on my ring finger and thumb and then use the three colours that I used for the camo print on the other three fingers.

Wednesday 29 May 2013

Rimmel: Purple Pulse with Accent Nail

Hi all,

Just a quick post this week.  I haven't done nail art this week as I had a busy Bank Holiday weekend and just fancied doing something quick.

Having done some purple ombré nails the other week I came across colours that I knew were lurking in my nail polish bag, but hadn't been used in a while.  I used Purple Pulse on my middle finger in the ombré and decided to come back to it this week as I missed it.  It's a pinky purple, but it gets darker the more coats you apply.

Rimmel-purple-pulse.jpg
 
This picture shows it more pinky than looking at it on my nails now.  It's more of a light plum in reality, but I love it.  I decided to spruce it up with an accent nail (because who doesn't love an accent nail when you don't have time for more!?).  I have used Revlon 095 Facets of Fuchsia which is a gorgeous transparent smokey polish with large and small purple glitter flecks.  I think it goes well with Purple Pulse and have used it on my ring finger and thumb.  You can see them both below.
 
 
Rimmel-purple-pulse-and-Revlon-facets-of-fuchsia.jpg
 
 
I'm not going to say that I am going to stop buying new colours because lets face it, it's just not going to happen, but I really need to make sure that I make the most of the pretty colours that I already have as well!  What are your favourite Rimmel and Revlon polishes?  Leave a comment to let me know, I'd love to see what other people have x
 
Related Posts Plugin for WordPress, Blogger...